Your show is getting this much better!
Your cart is empty
Continue shopping
Drawer menu
This page will help you set up the star models within XLights.
We don't offer custom models for our typical 5 point stars because the native (built in) models in XLights have an additional render style method, "Star Layer", that is not available for custom models. This gives you better control and possibly better mapping for sequencing.
You can find the official information in the XLights manual by clicking here if you wish.
Navigate to your "Layout" tab and then click on the "star" icon. On your layout click and drag to create a box. This will create a generic 50 pixel star by default.

If you purchased a 50 pixel star (whether a mini star or 20" star) - you can select your wiring start location, resize it, and locate it on your layout where you wish. You're done!
In this screenshot, circled in green shows that the star is setup as 1 string, 50 pixels, and is a 5 point star.
The red arrow shows the starting location (pixel 1) which then defines your wiring order.

The default star is 50 pixels and 1 layer. Many stars we sell will require additional information entered in to XLights to get the star to look right. This will include multiple layers. Your starting location will still be selectable in the same way as the screenshot above.
Lets start with an easy example of changing the star to 100 pixels. For this example we will assume you are using 1 string (port).
You simply start by changing the nodes/string from 50 to 100:

Notice, though, that the star on the right is still displaying as 1 layer with 100 pixels. If your intent is to create a 100 pixel, 1 layer star then - pick your starting location and you're done!
Let's continue the same example - 100 pixels on 2 layers. You would follow the same steps above to change the nodes/string to 100 and then you'll see that the Nodes/String changes to 101 - but that there is now a "+" to the left of "Layers" allowing you to expand the menu.

Expanding the menu will allow you to enter the number of pixels in each layer. In this example let's use the 20" 2 layer star as an example. It has 100 pixels, 2 layers with 60 pixels on the outer layer and 40 on the inner layer.
This is how you would set it up:
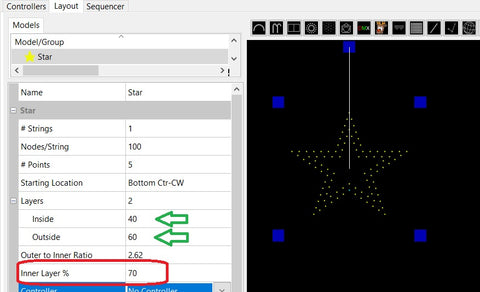
Notice the "Inside" has been set to 40, the "Outside" has been set to 60 - and that I also adjusted the "Inner Layer %" to 70 - this number can be adjusted until the model looks right to you.
Select your starting location and you're done!
For additional layers, you would change the layers count to the quantity of layers, then adjust each layer of pixels. See our table below for our star models, number of layers, and pixels per layer to help you create your star models!
Many of our models require several hundred pixels, including some stars. You handle the number of strings and pixels per string in the same manner that you would a megatree.
Example - a 400 pixel star setup on 2 strings would get setup based on the above information, but then you would change the number of strings to 2 and nodes/string to 200. This would equal out the 400 pixels.
Setting up uneven nodes/string would require a custom model - which you would then lose the native model and additional render style - therefore is not suggested.
Here is a table of our available 5 point stars and pixel layers to set up your star models:
For each of these, Layer 1 would be the 'outside' layer and layers move inwards.
| Star Name/Size | # Layers | Layer 1 | Layer 2 | Layer 3 | Layer 4 | Layer 5 | Layer 6 | Layer 7 |
| Mini Star, 50 pixels, single layer | 1 | 50 | ||||||
| Mini Star, 50 pixels, double layer | 2 | 30 | 20 | |||||
| Star - 20", Single Layer 50 pixes | 1 | 50 | ||||||
| Star - 20", Double Layer, 100 pixels | 2 | 60 | 40 | |||||
| Star - 20", 4 Layer, 150 pixels | 4 | 60 | 40 | 30 | 20 | |||
| Star - 27", 6 Layer, 300 pixels | 6 | 80 | 70 | 60 | 40 | 30 | 20 | |
| Star - 30", 7 Layer, 400 pixels | 7 | 100 | 80 | 70 | 60 | 40 | 30 | 20 |